
Before you go building a brick oven in the backyard, you owe it to yourself to experience the magic of grilled pizza. That’s right — pizza cooked right on the grill.
Picture a thin, chewy crust with a crispy outside. The bottom is lightly charred with marks from the grill. There’s a light dusting of flour on the outside of the crust. Its top is slathered in aromatic garlic-infused tomato sauce and piled high with fresh greens, melting mozzarella, and steaming tomatoes. There is hot meat cooked into the toppings, too. It could be prosciutto, pepperoni or sausage — either way, your mouth is watering. It’s time to learn how to cook one yourself.
Let’s explore how to properly grill a pizza, from prep work right until you’re ready to take the first bite. Once you’ve read through this ultimate guide, you’ll be ready to amaze your friends and family with your masterful grilled pizza skills.
Why Grill a Pizza Instead of Use an Oven?
People often assume that grilling a pizza is simply an easier way to make one. Perhaps it is — you don’t have to worry about preheating your oven, after all. However, there’s a more compelling reason behind this choice: it makes more delicious pizzas.
High temperature is what gives a pizza flavor. It adds that irresistible crunch to the pizza’s crust and that roasted edge to veggies and other toppings. Although your oven can reach a fairly high temperature, it doesn’t rival the smoky inferno of flavor that your grill can produce. A grill offers the best means of cooking delicious pizza precisely because it can get hotter than an oven.
Now get that grill blazing hot. Whether you’re using charcoal or propane, that extra heat is about to add some char that you won’t soon forget.
How to Make Pizza on the Grill
Now that you know the perks of having pizza straight from the grill, all you need to know is how to make it yourself! Luckily, making grilled pizza at home is an easy process any novice chef can pull off. If you’re ready to try your hand at preparing the perfect grilled pizza, check out these eight simple steps below.
Step 1 — Make the Dough
Of course, if you’re going to make pizza on the grill, you’ll need some dough. If you don’t already have pre-made pizza dough, this recipe makes enough dough for about eight small pizzas. Note — you’ll probably need around two balls of dough for each person. The ingredients you’ll need are:
- 2-1/4 teaspoons of active dry yeast or 1 ounce of fresh yeast
- 1-1/4 cups of warm water
- 4-1/4 cups of all-purpose flour
- 2 teaspoons of kosher salt
- 1/4 cup of olive oil, with more set aside to coat the bowl
Start by thoroughly mixing the yeast into the water and letting it sit for around 15 minutes. This ensures the water has been absorbed into all of the yeast. Next, combine salt and flour, using a stand mixer’s bowl if possible. Using a dough hook on a stand mixer will make this process easier. Stir at low speed, slowly pouring the olive oil and yeast mix alternating into the flour. Knead this mixture for six minutes. By the end, it should be elastic.
If you’re not using a stand mixer, you can knead the dough on a floured tabletop or breadboard. When you are done kneading, make sure the dough has the correct texture. It should be soft and have a little bit of stickiness to it. Don’t worry if it feels dry or grainy — you can remedy this by adding one tablespoon of warm water until it softens properly. Knead the dough for another couple of minutes until the water has absorbed.
Whether or not you plan to use the dough the same day or the next, put it in a large bowl with a bit of oil in it. If you plan on using the dough on the same day, cover the bowl with a damp cloth and let it rise for about an hour at room temperature. When you can poke it with your finger and the hole remains, it’s ready to cook. If you need to keep the dough for the next day, refrigerate the bowl, and the dough will rise slowly overnight.
You can also freeze the dough for use at a later time. To do so, immediately place the dough in a freezer bag and place it in the freezer. It’ll stay good for around a month. One day before using it, remove it from the freezer and refrigerate it.
Step 2 — Prepare Your Ingredients
Getting your ingredients prepped and organized is the key to successfully grilling pizza. If you’re using refrigerated dough to make your pizzas, remove it from the refrigerator and allow it to warm up to room temperature for around 20 minutes.
Next, you’ll want to get your sauce and toppings ready. If you’re using a homemade tomato sauce, now’s the time to whip up a batch. Otherwise, just make sure you have a can of pizza sauce on hand. As far as toppings go, make sure whatever you need to chop, dice or slice is cut so you can quickly add them to the pizza when the time comes.
If you need some grilled pizza topping inspiration, check out these delicious topping combos:
- Classic Cheese: Tomato sauce, provolone, cheddar, mozzarella cheeses
- Classic Pepperoni: Tomato sauce, pepperoni, mozzarella cheese
- Meat Extravaganza: Tomato sauce, Italian sausage, pepperoni, salami, mozzarella cheese
- The Everything: Tomato sauce, Italian sausage, pepperoni, salami, mozzarella cheese, black olives, bell pepper slices, mushrooms
- Hawaiian: Tomato sauce, Canadian bacon, chunks of pineapple, mozzarella cheese
- Mushroom Olive: Tomato sauce, mushrooms, black or green olives, mozzarella cheese
- Quatro Formaggio: Gorgonzola, pecorino, basil, asiago, mozzarella
- Prosciutto Express: Tomato sauce, prosciutto, red onion, rosemary, salt, pepper, mozzarella cheese
- The Bacon Cheeseburger: Tomato sauce, cooked ground beef, chunks of bacon, sharp cheddar, onion rings made from red onion, lettuce, tomato
- White Prosciutto: Prosciutto, diced garlic, ricotta cheese, kalamata olives, mozzarella, dribbled with extra virgin olive oil
- Meatball Delight: Tomato sauce, pre-prepared whole meatballs, cheese, mushrooms
- Barbeque Chicken: White sauce, chunks of pre-cooked barbeque chicken, bits of bacon, provolone, mozzarella cheeses
- Chicken Potato: Smoked chicken, roasted onion-garlic sauce, potatoes roasted with rosemary, smoked mozzarella, syrup of balsamic vinegar
- The Vermonter: Tomato sauce, spinach, red onion, apple slices, bacon bits, sausage, drizzled with maple syrup
- Margherita: cherry or plum tomatoes, mozzarella cheese, fresh whole leaves of basil
- Mushroom: Sauce made with roasted garlic, mushrooms including white, portabella, oyster and more
- Seafood: Roasted garlic, spicy shrimp or clams, pecorino, black olive, asiago cheese, spinach
- Salmon: Creme fraiche, olive oil glaze, smoked salmon, goat’s cheese, red onions, capers, diced chives, tomatoes, sweet peppers
- Quattro Stagioni: A pizza coated in tomato sauce and divided into four different quarters: roasted artichokes, chicken roasted with herbs, sautéed and tender mushrooms, roasted peppers, all covered with mozzarella
- Carciofo: Extra virgin olive oil, sprinkled sea salt, artichokes, slices of roasted bell peppers, parmesan, mozzarella cheeses
Along with your ingredients, make sure any grilling tools you’ll need are freshly washed and ready to be used. You’ll want a pair of long metal tongs, a basting brush and an oven mitt or a hot pad handy while grilling your pizza. You can also keep a spatula handy.
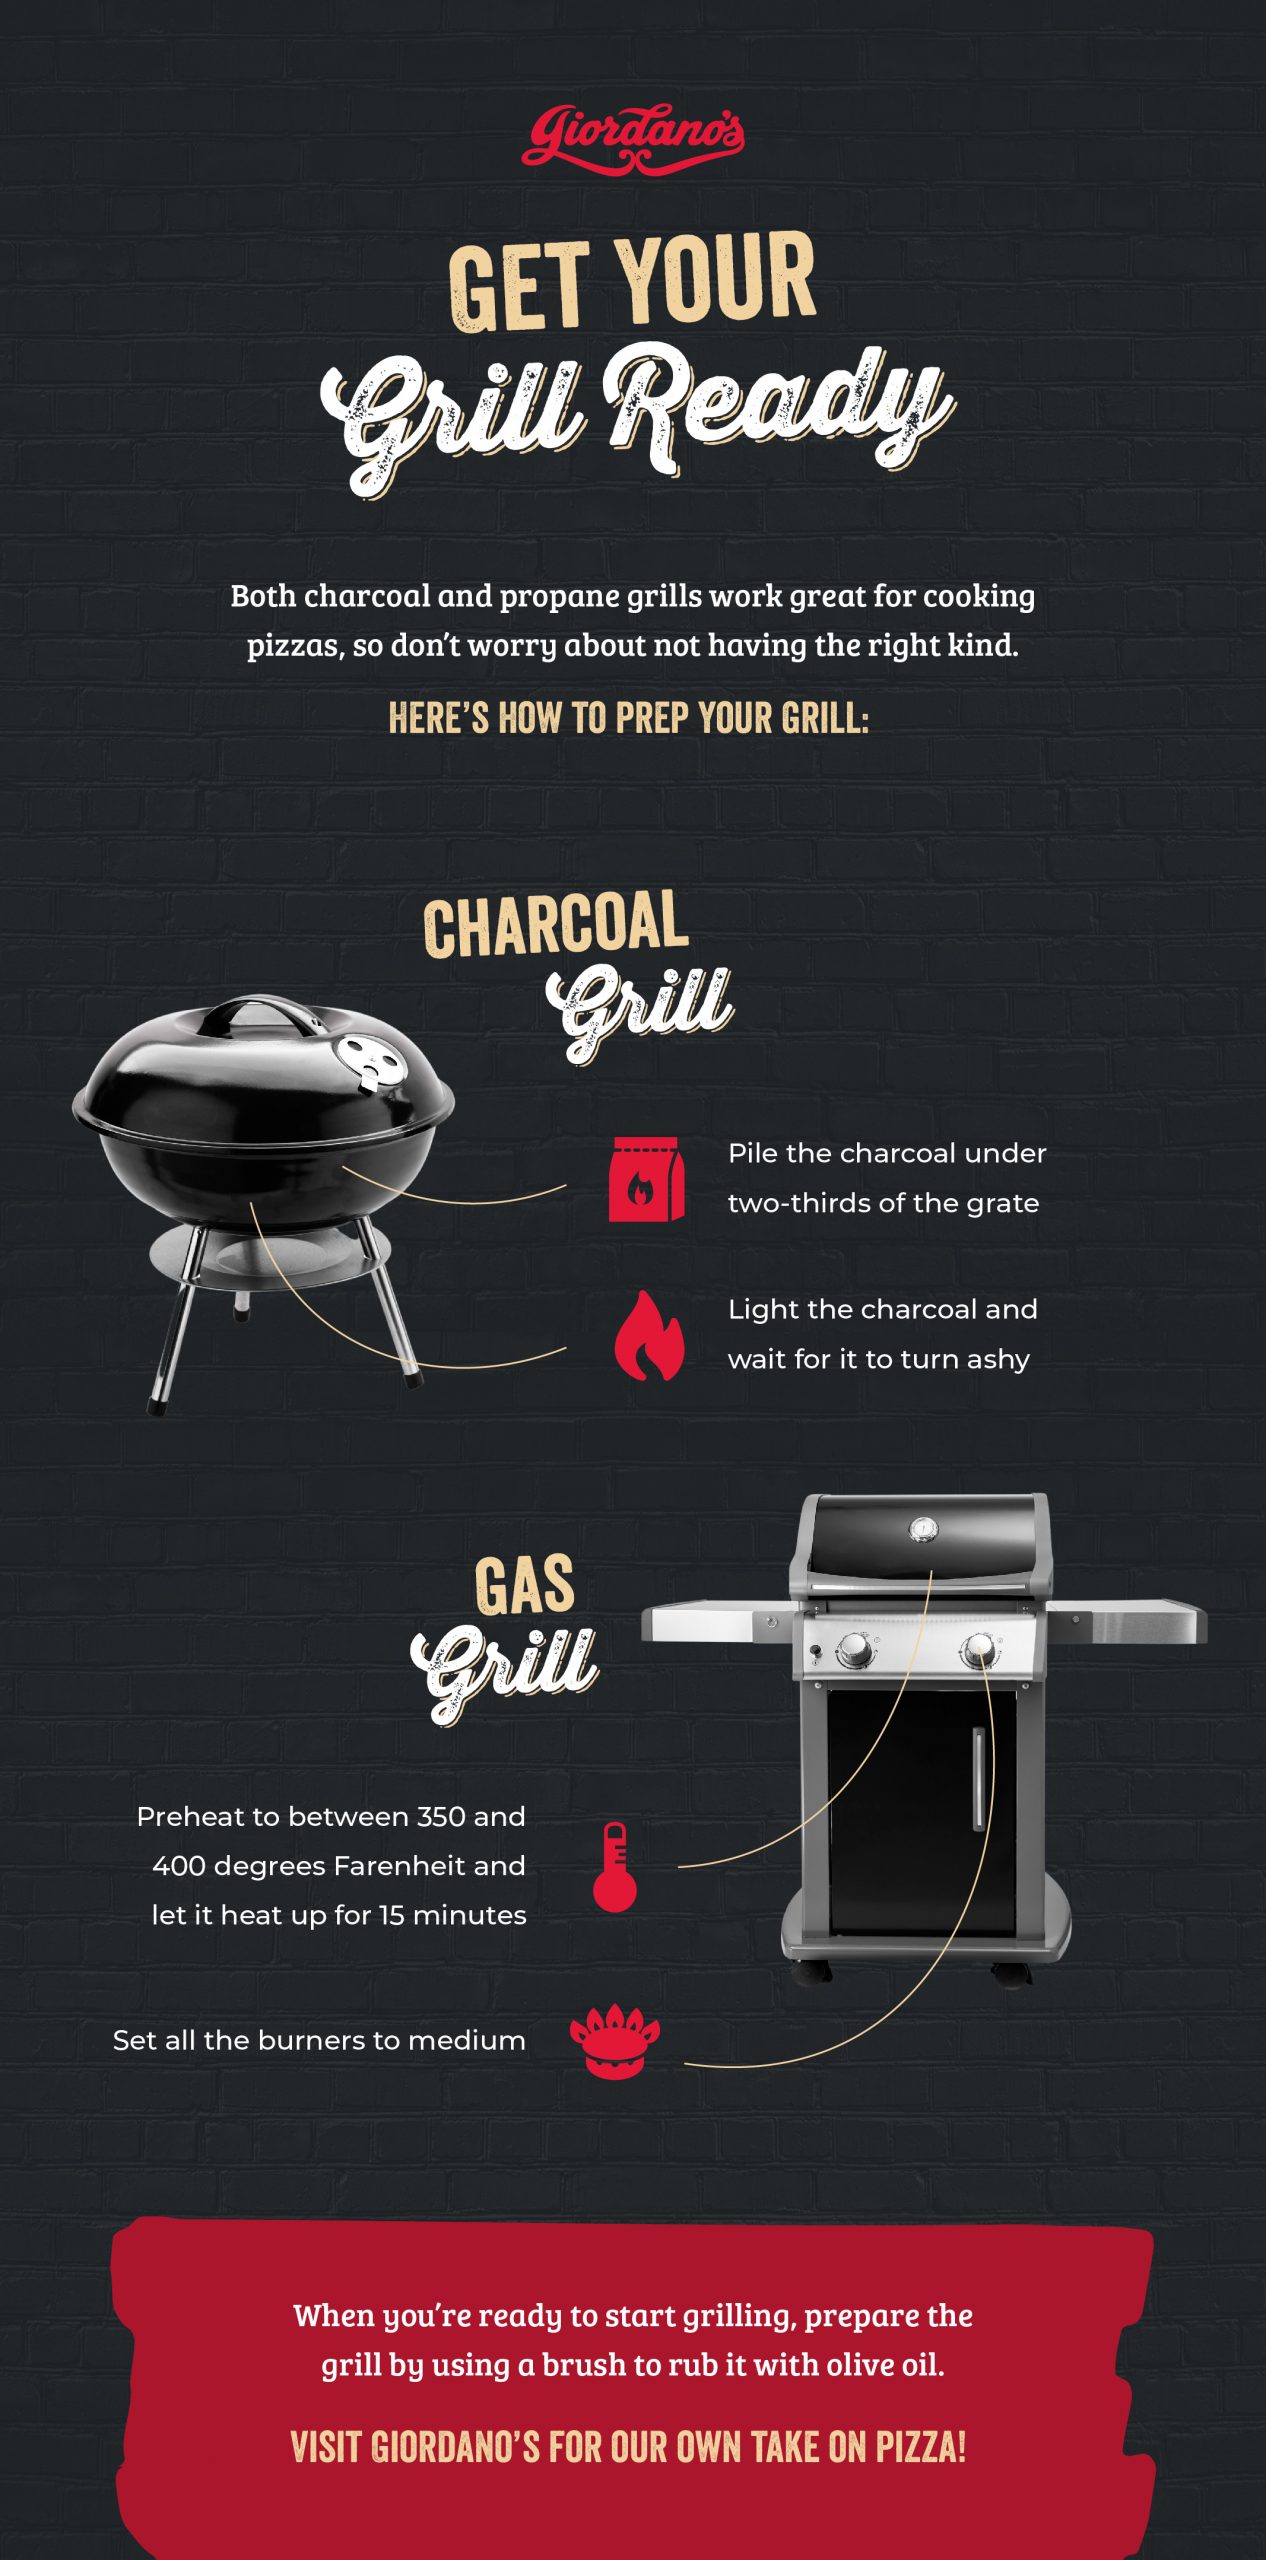
Step 3 — Get Your Grill Ready
Both charcoal and propane grills work great for cooking pizzas, so don’t worry about not having the right kind. If you use a wood-fire grill, that’s going to be fine as well. Here’s how to prep your grill:

- Charcoal Grill: The secret here is to leave a third of the grill open for low-heat cooking. Pile the charcoal under two-thirds of the grate, leaving the rest empty for indirect cooking. This gives you a last resort in case you need to rescue a pizza from burning. Light the charcoal and wait for it to turn ashy before cooking over it.
- Gas Grill: Preheat your gas grill to medium heat. Ideally, it will be between 350 degrees Fahrenheit and 400 degrees Fahrenheit. Let it heat up for around 15 minutes, and set all the burners to medium. There is not really any need to keep part of the grill free here, as in the charcoal grill. If your pizza starts burning or getting too charred, simply turn off the burner.
Get a bowl and pour some olive oil into it. When you’re ready to throw the first crust onto the grill, prepare the grill for cooking by using a brush to coat its grate with the oil. You can also fold up a paper towel, dip it into the olive oil with tongs, and then rub the grill with the paper towel.
Step 4 — Stretch Your Dough

Once your pizza dough has warmed up to room temperature, you can start getting it ready for the grill. To start, flour a tabletop, countertop, or breadboard. Divide your ball of dough into eight balls, roughly four ounces each. Placing each ball on the floured table, use your hands to stretch it and flatten it until it’s in the shape of a disk. It should ideally be about half an inch thick. Because it is such an elastic material, don’t be surprised if the dough wants to spring back into its original shape — just keep working it.
Once you’ve got them where you want them, cover the disks with plastic wrap so that no moisture can escape. Leave them alone for five minutes. Afterward, go about stretching and using a rolling pin to flatten each disk even more. The sections of dough should be around one-eighth of an inch thick. These pizzas are best served thin, so make sure the crusts aren’t too thick. Each disk should be between eight and 10 inches in diameter.
If your dough is being stubborn and doesn’t want to conform to the shape you are insisting upon, cover it again with plastic and give it a few more minutes to rest. While you do this, take a baking sheet and line it with waxed paper. Lay a disk down on it, then place another piece of waxed paper on top and lay the next disk down — continue until all of the disks are stacked. You’re now ready to use the dough.
If you need to wait before grilling the pizzas, the dough can be refrigerated for up to four hours. Note that you shouldn’t give the pizza a raised crust, as this will make it hard to handle when it’s time to grill.
Step 5 — Give the Crust a First Grilling
You’ll be cooking one side of the crust first, then the other. Take a rimless baking sheet and lightly flour its surface, so that the crust can slide easily once it’s placed on it. Ensuring you’ve brushed the grill with olive oil, bring the crust over and let it slide off the baking sheet onto the grill. Use an oven mitt or hot pad to close the lid and let it cook for about two minutes.
Use a spatula to check the underside of the dough. You can tell if it is cooking by the formation of air pockets. The underside should be browned. Occasionally, one side of the crust will brown while the other stays white — if this is the case, simply rotate it so that the other side can cook. Let it cook for another minute.
Step 6 — Remove the Pizza From the Grill
When the crust has turned light brown on the bottom and has air pockets on top, use your tongs to take it off the grill and place it on a baking sheet. Flip the crust upside down on the baking sheet, with its cooked side up. Close the grill cover so it doesn’t cool off — you’ll need your grill to retain its heat through the next step.

Step 7 — Add Your Toppings
Now that your half-baked crust is off the grill, it’s finally time to add some toppings! Although piling on all your favorite toppings is the most exciting part about making homemade pizza, make sure to go light on your grilled pizza toppings. Adding a bunch of food to the top of your pizza will weigh it down, making it soggy and more difficult to grill well.
First, take your olive oil brush and apply a light coating over the grilled top of the crust. Then, spread no more than one ladle full of sauce onto your pizza. Resist the temptation to add more, or your pizza will get mushy. Sprinkle all the toppings you prepared earlier over the top of the pizza, ending with the cheese.
Step 8 — Put the Pizza Back on the Grill
When you’ve assembled your dream pizza, take it back out to the grill on the baking sheet. Note that if you’re using a propane-powered grill, it might be a good idea to turn the burners down a bit at this point. For a grill with charcoal, turn the vents all the way closed on top of the grill to stifle oxygen and reduce heat. You may also need to reapply a light coating of olive oil.

Let the pizza slide off the baking sheet, feeding it onto the surface of the grill. Close the lid. It should cook for between two and three minutes. You’ll be able to tell it is ready when the cheese is bubbling or the bottom starts to get charred or both. Take the pizza off the grill using your tongs or a large spatula, and let it cool down for several minutes before serving.
Once your grilled pizza has cooled a bit, slice it up and enjoy!
Visit Giordano’s for Our Own Take on Pizza
Giordano’s has thin and extra thin crust pizzas that give you the similar experience of grilling your very own pizza — but hey, who’s to say you can’t reheat our pizza on the grill with a pizza stone, instead of a skillet?
Of course, we’re also famous for our unique style of stuffed deep dish pizza.
Our famous style marks an evolution of pizza over the course of two centuries. We serve an extremely special dish — a stuffed pizza composed of a bottom crust, a layer of fresh toppings, loads of melty cheese, another fine layer of crust, and a thin layer of sauce to top it off. This is unique from other pizza restaurants — even those that make standard deep dish pizzas. Dig in with a fork and knife and experience pizza like you’ve never had it before.
Where did this unique pizza come from? It originated in the northern part of Italy, near the city of Torino. Mama Giordano was a well-known figure in this town — her mouth-watering cooking was legendary. She had a much-loved dish known as the “Italian Easter Pie,” which had two crusts and a stuffing full of cheese in between. Even after Mama Giordano had passed on, her family kept this recipe as a sacred part of their legacy. It’s still special in Torino today.
Many years later, two Italian brothers immigrated to America. Joseph and Efren Boglio chose Chicago as their landing spot, where they opened their own pizza restaurant in 1974. This restaurant was called Giordano’s, and it was located in the south side of Chicago. As a special, traditional take on Chicago’s famous deep-dish pizza, this restaurant quickly became known as the city’s best stuffed pizza.
For 40 years onward, it has attracted millions of happy customers and garnered lots of critical praise. Along with incredible starters like fresh salads, our restaurant also offers authentic pasta and one-of-a-kind sandwiches.
Giordano’s continues to make headlines both in our city and around the country. As we continue to top the “best of” lists for pizza, we always like to remember our humble roots and the love that Mama Giordano put into her Italian Easter Pies.
